If you’ve been considering going solar but feel overwhelmed by the process, you’re not alone. Between permits, wiring, inverters, and utility approvals, residential solar panel installation can feel like a black box. The good news? Once you understand each phase, it becomes far less intimidating, and far more exciting.
This guide walks you through the entire solar panel installation process, from your very first roof inspection all the way to flipping the switch. Whether you’re looking for a solar installer in Texas, Florida, Minnesota, Illinois, Arizona, or Colorado, or just trying to understand what your quote actually includes, this breakdown has you covered.
Phase 1: Initial Roof & Site Assessment
Every quality rooftop solar panel installation begins with a thorough evaluation of your property, not with someone trying to close a sale.
A certified solar installer will assess several critical factors during this visit. First, they examine your roof’s structural integrity. Solar panels add roughly 2–4 pounds per square foot, so your roof must be able to handle that load safely. If your roof is older than 15 years or showing signs of wear, most reputable contractors will recommend repairs or a partial replacement before mounting any equipment.
Next comes orientation and tilt analysis. In the U.S., south-facing roofs pitched between 30–45 degrees capture the most sunlight. East or west-facing roofs can still work well, though output may be reduced by 10–20%. Your installer will use solar pathfinder tools or satellite software to map shade patterns from trees, chimneys, and neighboring structures throughout the year.
Finally, they’ll assess available square footage. A typical home solar panel system installation for an average American home requires 300–600 square feet of unobstructed roof space, depending on system size. Your installer will also evaluate your electrical panel to confirm it can handle the new system load, or flag that an upgrade is needed.
Phase 2: System Design & Permitting
After the site visit, your installer designs a custom system tailored to your energy consumption, roof geometry, and local utility requirements. This includes selecting the best solar panels for your home roof (monocrystalline panels are the most popular for residential use due to their efficiency and durability), choosing between string inverters and microinverters, and deciding whether to add battery storage.
Once the design is finalized, your installer submits for building and electrical permits from your local municipality. This is one of the most underappreciated steps in the solar panel installation process. Permits can take anywhere from a few days in solar-friendly markets like Arizona and Colorado to several weeks in some Illinois and Minnesota jurisdictions. Skipping this step isn’t an option, unpermitted systems can void warranties, complicate home sales, and trigger fines.
Your installer also files an interconnection application with your utility company, which grants permission to connect your system to the grid. This step typically runs parallel to the permitting process.
Phase 3: Equipment Procurement & Scheduling
Once permits are approved, your installer orders your equipment and schedules the installation date. Most of the hardware: panels, racking, inverters, and conduit arrives within one to two weeks of permit approval.
This is a good time to review your solar panel installation price breakdown one more time. For a typical 7–8 kW system (enough to power most American homes), you can expect a gross cost of $21,000 to $23,000 before incentives, or roughly $2.84 per watt at the national average. Larger 10–12 kW systems for bigger homes can reach $25,000–$29,000.
The solar roof installation cost per square foot is less commonly used as a metric than cost per watt, but ballpark figures run $4–$10 per square foot of roof space used, depending on system complexity and region.
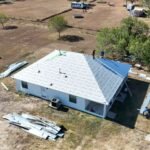
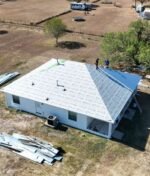
Phase 4: Physical Installation Day(s)
The on-site installation for most residential systems takes one to three days. Here’s what actually happens:
Step 1 — Roof Attachment Points. Installers locate the roof rafters (typically spaced 16–24 inches apart) using a stud finder or by measuring from the roof edge. They drill into the rafters and install lag bolts topped with aluminum stanchions, the primary load-bearing anchors for your entire array. Each penetration is sealed with flashing and roofing sealant to prevent water intrusion.
Step 2 — Racking Rail Installation. Aluminum mounting rails are bolted across the stanchions, creating the skeleton of your panel array. Each rail is checked for level and squared diagonally to ensure panels will sit flush. For tile roofs, special tile hooks replace standard flashing; for metal roofs, non-penetrating clamps are used.
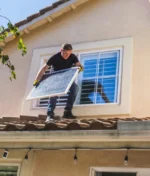
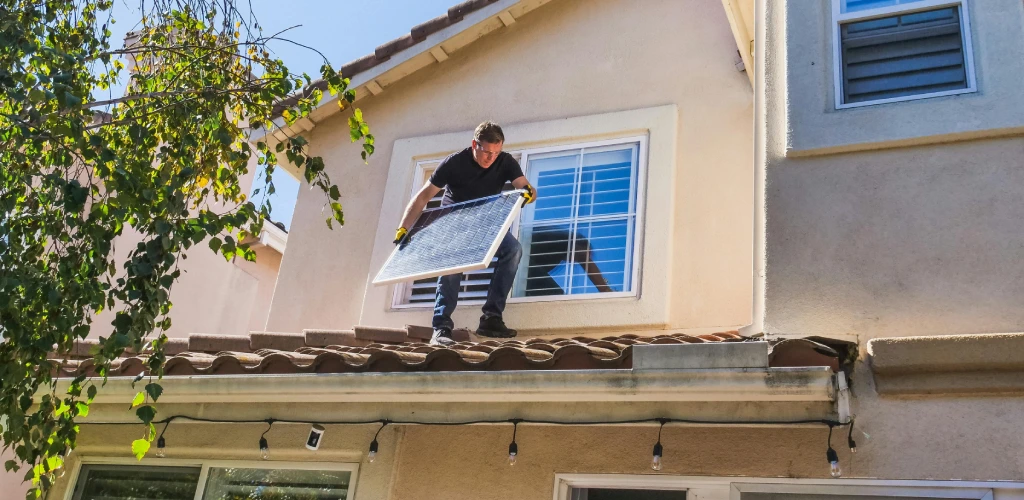
Step 3 — Wiring Before Mounting. This is a detail many homeowners don’t know: on a rooftop solar panel installation, each panel’s wiring connectors are attached before the panel is bolted to the rail, because once mounted, those connectors become inaccessible. Panels connect in strings (or individually, with microinverters) using weatherproof MC4 connectors.
Step 4 — Panel Mounting. Each panel is lifted onto the rails, usually a two-person job given their weight of 40–50 lbs, and secured with mid-clamps and end-clamps to the specified torque. Installers work methodically across the array, row by row.
Step 5 — Inverter & Electrical Work. The DC power generated by your solar panels for roof needs to be converted to AC power usable in your home. Your inverter (mounted in the garage or utility room) handles this conversion. A licensed electrician runs conduit from the roof down through the attic or exterior wall, connects the inverter to a new production meter, and ties the system into a dedicated breaker in your main electrical panel.
Phase 5: Inspection & Utility Approval
After installation, your local building department schedules a final inspection, typically within one to two weeks. The inspector verifies that the system matches the approved permit drawings, that all electrical connections are code-compliant, and that the roof attachments are structurally sound. Most systems pass on the first inspection.
Following the building inspection, your utility company conducts its own review and issues what’s called Permission to Operate (PTO), the green light to actually turn your system on. This is the step that formally “places your system in service” for tax and incentive purposes. Depending on the utility, this process can take anywhere from a few days to four weeks.
Phase 6: System Activation & Monitoring
Once PTO is granted, your installer returns to activate the system and walk you through your monitoring app. Real-time monitoring lets you see exactly how much energy each panel (or the array as a whole) is producing at any moment, track monthly generation against your electric bill, and receive alerts if any panel underperforms.
Your installer will also explain net metering — if your utility offers it — which allows excess solar energy to flow back to the grid in exchange for bill credits. This is especially valuable in sun-rich states like Arizona, Florida, and Texas, where systems often overproduce during long summer days.
Understanding Solar Panel Installation Cost & Financing in 2026
The average cost of solar panels for home installation in the U.S. sits at around $21,000–$29,000 depending on system size, roof complexity, and your region. Labor is typically 10–15% of total project cost; the panels themselves only account for about 12% — the rest covers inverters, racking, wiring, permits, and installer overhead.
The Federal Solar Tax Credit 2026: What Changed
This is critical information for homeowners in 2026: the 30% federal solar tax credit (Section 25D) expired on December 31, 2025 under the “One Big Beautiful Bill” signed into law in July 2025. For homeowners who own their systems outright (cash or loan), that credit is no longer available for new installations. A homeowner who installed in 2025 saved an average of $6,544–$8,745 in federal taxes; that savings is now gone for direct-purchase systems.
However, there’s still a path to indirect savings. Third-party owned systems, solar leases and Power Purchase Agreements (PPAs), continue to qualify for the commercial 48E tax credit through 2027. Providers typically pass those savings on as lower monthly rates.
If you installed your system before December 31, 2025, you can still claim the 30% credit when you file your taxes using IRS Form 5695.
State-Level Solar Rebate Programs
Don’t overlook state and utility-level incentives, which vary significantly. Net metering programs, property tax exemptions for solar, and state-level rebates remain available across the country. Homeowners in Minnesota benefit from the state’s solar incentive programs through Xcel Energy; Illinois has its Adjustable Block Program offering renewable energy credits; Colorado offers net metering and property tax exemptions; Arizona has a 25% state tax credit (capped at $1,000); Florida offers full property tax exemption for solar; and Texas relies primarily on net metering and local utility rebates.
Solar Financing Options: Solar Loan vs. Lease vs. Cash
Your solar financing options affect both your upfront cost and long-term savings:
- Cash purchase delivers the lowest total cost and fastest payback period (typically 7–10 years for most U.S. markets), but requires significant capital up front.
- Solar loan lets you own the system with little to no money down while spreading payments over 10–25 years. Interest rates typically range from 3.99–8.99% APR. You own the system, so you capture all savings — minus interest costs.
- Solar lease or PPA means a third party owns the system and you pay a monthly rate for the electricity it produces. No ownership benefit, but zero upfront cost and predictable bills. In 2026, this structure may also pass along 48E tax credit savings.
The solar payback period depends on your utility rates, system size, and financing method. On average, homeowners who purchase their system see a payback of 7–10 years in most U.S. markets, followed by 15+ years of near-free electricity from a system warranted to last 25–30 years.
How to Find the Right Solar Installer Near You
When searching for a solar panel installation near me, don’t choose purely on price. Vetting your installer is as important as the equipment itself. Look for NABCEP-certified installers, check Google and EnergySage reviews, and always compare at least three quotes. Ask specifically about workmanship warranties (look for 10+ years), response time for service calls, and whether they handle permitting in-house.
Local solar contractors in Texas, Florida, Minnesota, Illinois, Arizona, and Colorado will each have different expertise in local permitting and utility interconnection — another reason to work with someone who knows your specific market.
Final Thoughts
The solar panel installation process, from first site assessment to system activation, typically spans 6 to 12 weeks, most of that time is permits and utility approvals, not actual construction. The physical installation itself is often done in just one or two days by an experienced crew.
Understanding each phase puts you in a far stronger position when evaluating quotes, asking the right questions, and making a decision that fits your home, your budget, and your energy goals. Whether the economics make the most sense right now or in a year, the fundamentals of how solar works, and how it gets installed — don’t change.
Note: Tax credit information reflects current law as of early 2026. Consult a qualified tax professional before making financial decisions based on incentive eligibility. For professional solar panel roof installation, contact us now!